Validate Emails in HubSpot Chatflows with Clearout

Verify Chatbot and Live Chat Leads in Real-Time with Clearout Email verification API for HubSpot Chatflows


No Credit Card Required | Give it a shot

Why Do You Need Email Verification on HubSpot Chatflows?


HubSpot Chatflows is a highly popular and powerful tool for lead generation, but its capabilities can be further enhanced by integrating with Clearout Email Verifier. Through this integration, Clearout's advanced features can greatly improve the effectiveness of the HubSpot Chatbot, taking lead quality to a whole new level.

Without email verification, chatbots are susceptible to frequent email typos and users providing fake, temporary & invalid email addresses. This leads to a buildup of incorrect and unreliable contacts, wasting valuable company resources and potentially losing out on valuable leads and their trust.

By integrating Clearout's real-time email verification into HubSpot's chatbot, email addresses can be validated at the point of capture. This integration acts as a safeguard, identifying incorrect or invalid email addresses and preventing them from being added to your contact lists. By implementing this solution, businesses can ensure that all collected email addresses are accurate and valid, improving the overall quality of their leads.

Note: This solution is available for HubSpot Chatbots only.

Witness the power of Clearout's Email Verifier integrated with HubSpot Chatflows!


Integrate Clearout in HubSpot Chatflows to Remove Invalid Leads at Point of Capture


Navigate your way to the type of bot you use - HubSpot Login -->Conversations--> Chatflows--> Create Chatflow --> Website --> Select any Bot. The steps given below are for 'Qualify leads bot':

1. Once 'Qualify leads bot' is selected, click Next to reach the Build section to edit the Action Boxes.

2. Scroll down to the Action box named Get Email and click on the + icon below it to create a new action for email verification.


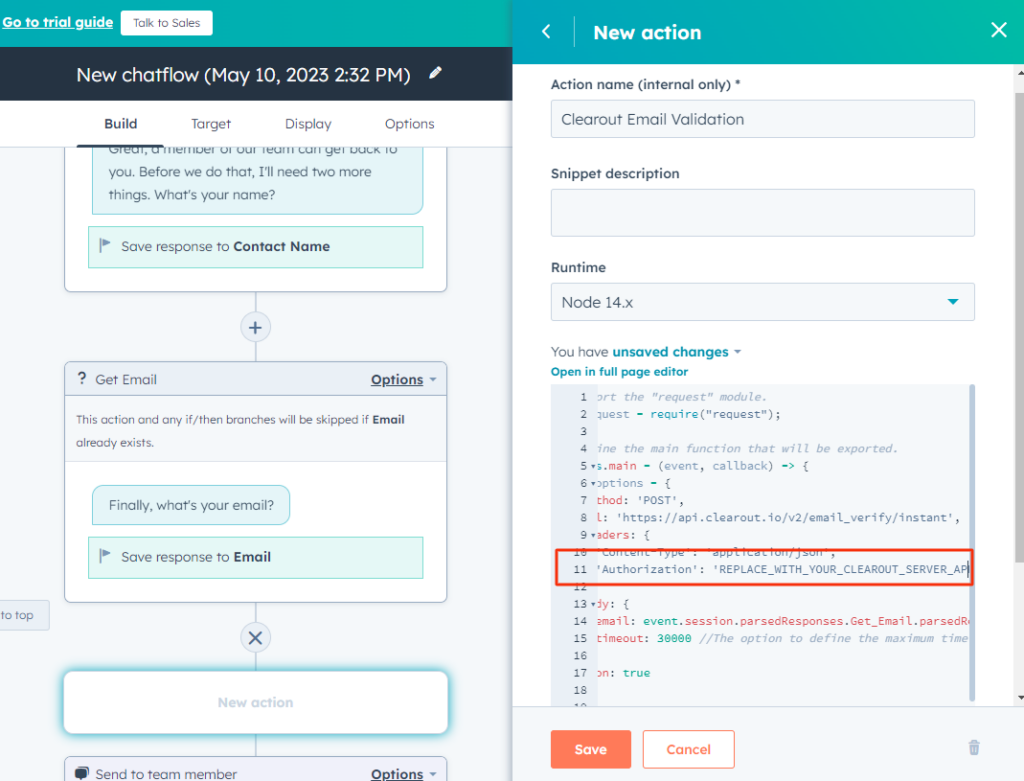
3. A new Action window will open. Scroll down to Run a code snippet, give an Action name and delete the existing code.


4. Now Copy and Paste this code.

// Import the "request" module.
var request = require("request");

// Define the main function that will be exported.
exports.main = (event, callback) => {
  var options = {
    method: 'POST',
    url: 'https://api.clearout.io/v2/email_verify/instant',
    headers: {
      'Content-Type': 'application/json',
      'Authorization': 'REPLACE_WITH_YOUR_CLEAROUT_SERVER_APP_TOKEN',   // Add authorization token (API key).
    },
    body: {
      email: event.session.parsedResponses.Get_Email.parsedResponse, // Get the email address from the event object.
      timeout: 30000 //The option to define the maximum time that can be used for verifying the status of the given email address.
    },
    json: true
  };

  request(options, function (err, response, body) {
    if (err) throw new Error(err); // Handle errors.

    // initialize default value 
    let nextModuleNickname = 'send_to_team_member'     // The next module your bot will go to. If nothing is provided,we will select the next module in the bot path for you.
    let botMessage = '' // The message your bot will return.
    let responseExpected = false   // Whether or not this code snippet should be executed again with the next user input.

    // check entered email is safe to send if not then ask user to re-enter the email.
    if (body.data.safe_to_send === 'no') {
      nextModuleNickname = 'Get_Email'
      botMessage = `${body.data.email_address} is not valid email address`
    }
    // set the response.
    const responseJson = {
      botMessage,  
      nextModuleNickname,
      responseExpected
    }
    callback(responseJson);
  });
};


5. Edit Row 11 by replacing 'REPLACE_WITH_YOUR_CLEAROUT_SERVER_APP_TOKEN' with Clearout's API Token and Save.


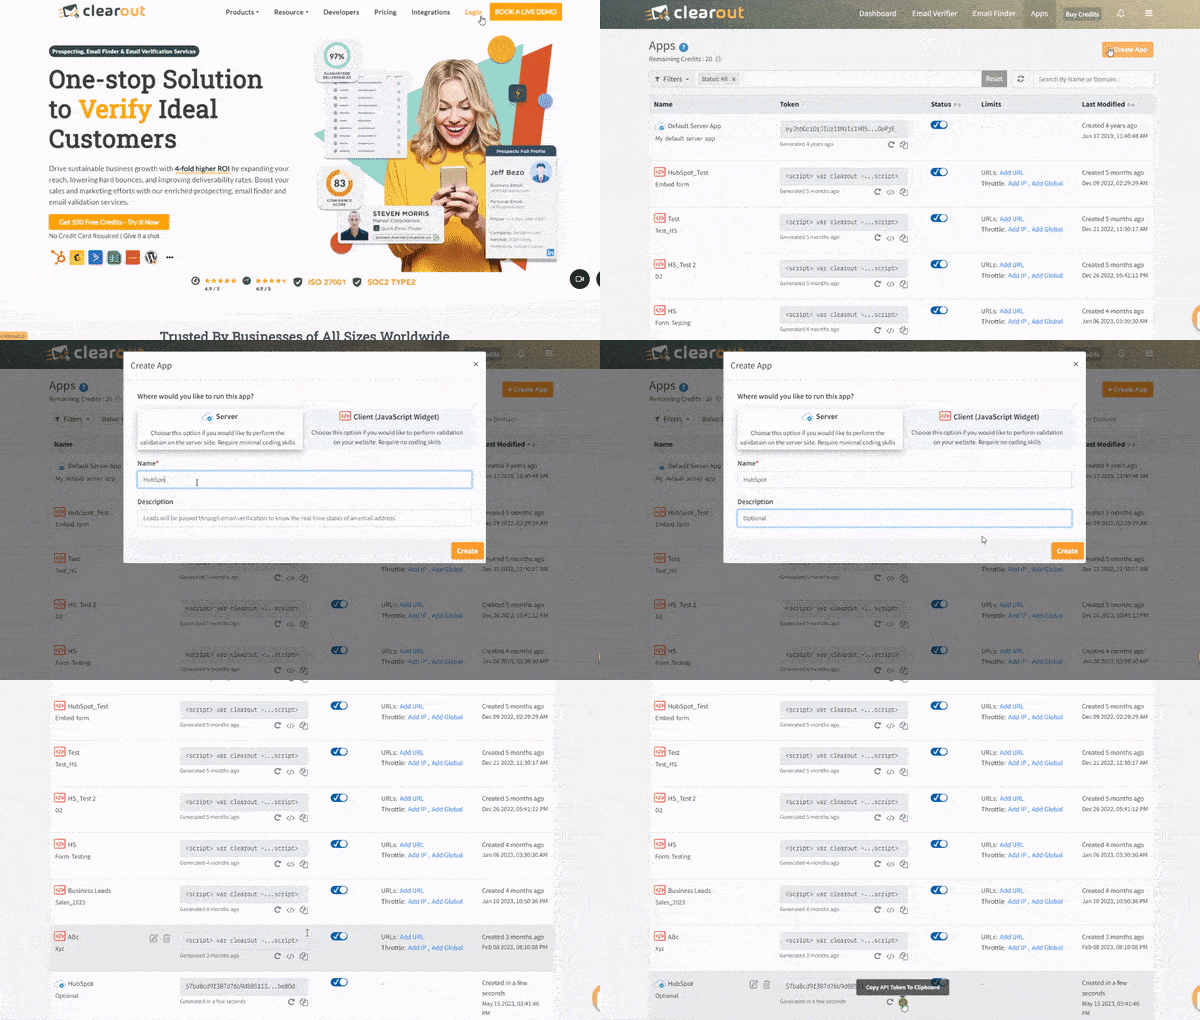
6. How To Generate Clearout API Token?

  • ● Enter Clearout and navigate your way to Apps-->Create App-->Server
  • ● Give a name , description to the token and click Create
  • ● Copy the API token and paste it in Row 11 of the code


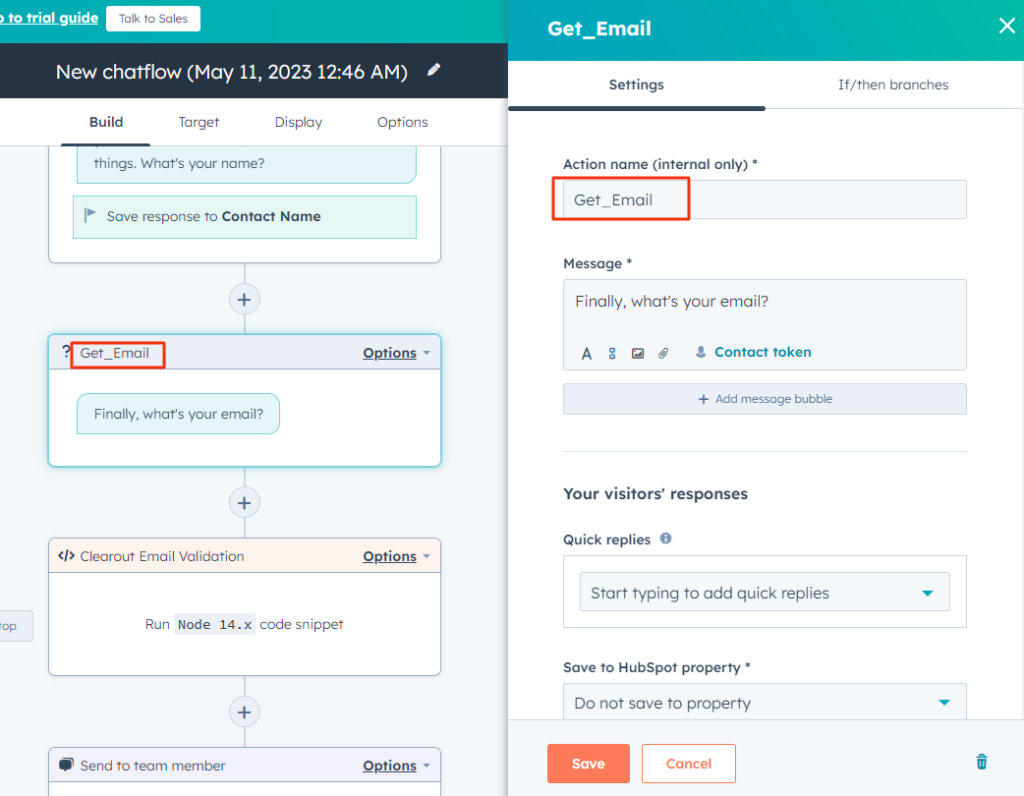
7. Go to the Get Email action box and edit the action name to Get_Email.

Note: The name should be exactly the same.


8. In the same Action box scroll down to Save to HubSpot property. Choose Email from the dropdown. Uncheck the box that says Skip this action if property already exists and Save.


9. Your HubSpot chatbot with real-time email verification is READY! Give it a test run by hitting Preview.

Wasn't that quick and easy? The addition of a simple code snippet to your Chatflows can effectively block unwanted junk data from infiltrating your system. Let's make a conscious decision to work exclusively with fresh and valid data, ensuring we don't squander our precious time on irrelevant information.

How to Create a HubSpot ChatBot?


If you're new to HubSpot and need guidance on getting started with creating a bot, feel free to visit this page or reach out to us at [email protected]. We're eager to assist you!

Certified by HubSpot, Awarded by the Best!


emea_leader_g2 momentum_leader_g2 rating hubspot_certified_app emailverification_leader leader_europe_leader

HubSpot Email Validation

Validate Emails Across HubSpot

Have An Enquiry?

Contact Us

Talk To An Expert

Book A Demo