



clearout
  • Products
    • Email Verifier Verify emails addresses individually, in bulk or through API, with 99% accuracy
    • Catch-all Email Verification IconCatch-all Email Verification Resolve more catch-all and SEG-protected emails into Valid or Invalid results with Deep Verify.
    • Email Finder Find individual or bulk emails by entering the person & company name or domain
    • Form Guard IconForm Guard Protect your forms from spam, bots, and invalid submissions with real-time email, phone, and name verification.
    • Form Guard IconData Pulse Verify, enrich, and monitor your CRM contacts in real time - heartbeat monitor for your data.
    • ProspectSQL/MQL list building with high levels of personalization, real-time data enrichment and prospect search
    • Clearout For SheetsVerify email addresses directly on Google Sheets with Clearout for sheets add-on
    • Prospect – LinkedIn Chrome ExtensionBuild verified, targeted prospect lists directly from LinkedIn profiles
    • ClearoutPhoneValidate phone numbers across 240+ countries in bulk, quick or real time validation
    • Free Tools
    • Disposable Email Checker
    • Reverse LinkedIn Profile Lookup Tool
    • Reverse Email Lookup Tool
    • Email List Cleaner
    • Company Domain Finder API
  • Resources
      DEVELOPERAPI iconAPI
      Clearout APIs are structured around REST and JSON
      Webhooks iconWebhooks
      Capture real-time events in your application workflow
      Form Guard iconForm Guard
      Real-time form validation to keep bad contacts out of your CRM
      KNOWLEDGE BASEGetting started iconGetting started
      Sending campaigns without bounces is made simple
      FAQ iconFAQ
      Easily find answers to services, security and common questions
      USE CASESLead Generation iconLead Generation
      Learn how professionals generate quality leads
      GUIDESPricing arrow iconTransparent & flexible pricing to support pay-per-use or recurringCompare Email Verification Tools arrow iconAI-powered email verification with 99%+ accuracy, real-time validation, and transparent risk scoringCompare Email Finder Tools arrow iconPre-verified B2B email addresses with confidence scoring, find real person email, not role-based addressData Pulse & HubSpot Breeze Intelligence arrow iconPre-verified B2B email addresses with confidence scoring, find real person email, not role-based addressBLOGSEmail Verification ToolsFind Anyone’s Email Address
      Most Accurate, Fast & Free Ways
      Form Validation
      Importance, Ways & Best Practices
      View All Blogs
  • Pricing
  • Integrations
  • Enterprise
  • Login
Try it free Book a 1-to-1 demo
Akanksha Mishra / September 28, 2026 September 28, 2026

How to Set Up Lead Routing Rules in Lofty CRM


How to Set Up Lead Routing Rules in Lofty CRM

TL;DR


  • Lead routing determines which rep, team, or role receives an incoming lead.
  • Routing can break when the information used to make that decision is missing, outdated, or incorrect.
  • You can configure routing at the company, office/team, or personal levels.
  • Each rule can have its own conditions, working hours, assignment method, and selected agents.
  • Lofty supports Round Robin, Next Up, and Blast Alert assignment methods.
  • Rules are checked from top to bottom, so specific rules should come before broader ones.
  • The Default Rule catches leads that don't match an earlier rule.
  • Test new rules with sample leads and review routing logs when an assignment is unexpected.
  • Clean lead data supports better routing and follow-up. Clearout Data Pulse helps validate contact records before they enter downstream sales workflows.

Table Of Content


‣ TL;DR
‣ How should you set up lead routing rules in Lofty CRM?
‣ How does data quality affect Lofty lead routing?
‣ What happens after Lofty routes a lead?
‣ Which lead assignment method should you choose in Lofty?
‣ How to manage existing Lofty lead routing rules?
‣ Frequently asked questions about Lofty CRM lead routing
You've set up your Lofty lead routing rules. Leads are coming in. But some are still landing with the wrong sales rep.

That can happen when the information used by your routing rules is missing, outdated, or incorrect. A wrong ZIP code can send a lead to the wrong territory. An incorrect source or tag can make it match a different rule. And once the lead is assigned, an invalid email or phone number can make follow-up harder.

Lofty evaluates the information available on each lead to determine which routing rule applies. So when the underlying data is wrong, even a correctly configured rule can produce an unexpected result.

This guide explains how Lofty CRM lead routing works, how to configure routing rules, and how data quality can influence both lead assignment and follow-up.

How should you set up lead routing rules in Lofty CRM?


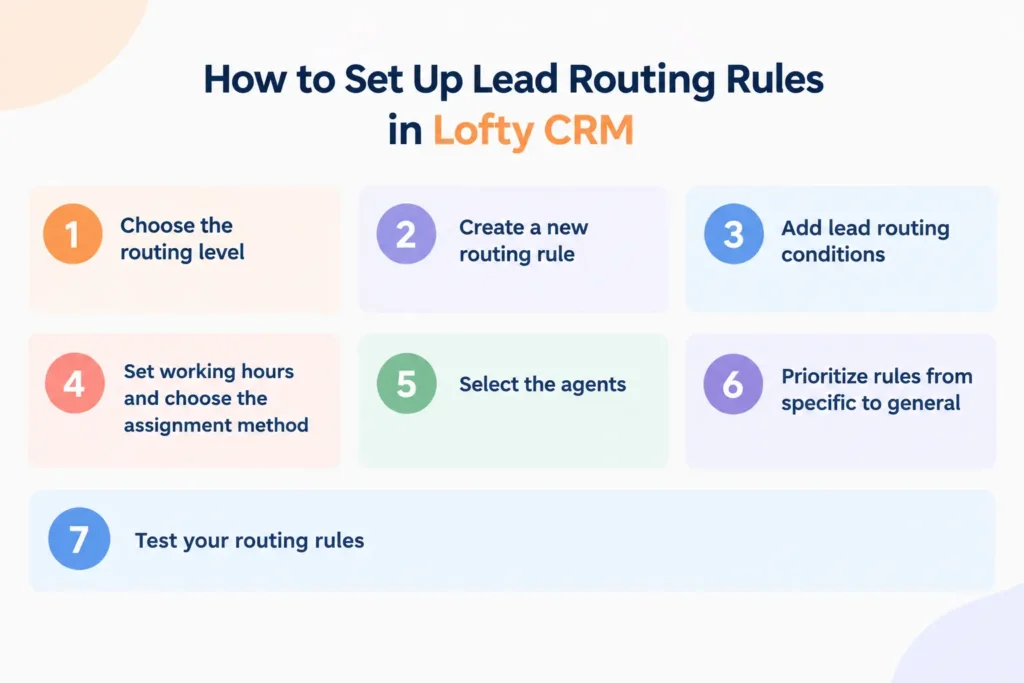
Seven steps for setting up lead routing rules in Lofty CRM.

Setting up one routing rule is straightforward. The problem begins when you have different rules for different locations, lead sources, teams, or agents. If conditions overlap, or rules are in the wrong order, a lead can get picked up by a rule you didn't intend.

A well-organized setup will let you see why a lead went where it did, and fix problems if something went wrong.

Step 1: Select routing level


Open "Settings" and choose the routing level you want to configure. Then locate "Lead Routing" under "Lead Settings."

Choose the ownership level you want to configure:

  • Company Lead Routing: Controls routing at the company level.
  • Office Lead Routing: Controls routing within an office or team.
  • Personal Lead Routing: Controls routing for an individual user.

Choose the level that matches how your team manages lead ownership in Lofty.

Step 2: Create a new routing rule


Click "Add New" to create a routing rule. Give the rule a name that clearly identifies its purpose. For example, you could use a name such as "Phoenix Buyer Leads - Round Robin."

Clear names make rules easier to manage when your routing setup grows. They also make routing logs easier to understand during troubleshooting.

Step 3: Add lead routing conditions


Next, define which leads should match the rule.

Lofty supports conditions such as:

  • Lead source
  • Location or ZIP code
  • Tags
  • Other lead attributes

The system evaluates incoming leads against these conditions. A lead continues through the routing list until it matches an applicable rule.

Some fields, such as tags, can use options such as "Match Exactly" or "Empty or Match Exactly" to control how leads match the rule.

Review each condition before saving the rule. A condition that is too broad can capture leads intended for another rule.

Step 4: Set working hours and choose the assignment method


Set the days and times when the rule should be active. If a lead comes in outside the rule's working hours, Lofty moves on to the next applicable rule.

Next, choose how matching leads should be assigned. Lofty supports Round Robin, Next Up, and Blast Alert.

Choose the method based on how your team handles incoming leads. Round Robin distributes leads in rotation, Next Up assigns them to the next eligible agent based on availability or queue order, and Blast Alert notifies multiple agents so one can claim the lead.

Vacation mode also affects lead availability. When an agent has Vacation Mode enabled, Lofty won't distribute leads to that agent. If all agents in a rule are unavailable, the lead moves to the next applicable rule or the Default Rule.

Make sure the relevant users have the correct time zone configured so lead distribution follows the expected schedule.

Step 5: Select the agents


Choose the agents who should receive leads that match the rule. The available agents depend on the routing level and ownership setup you selected.

Before saving the rule, check that all the right agents are included. If an agent isn't part of the selected group, they won't be considered when Lofty assigns a lead through that rule.

Step 6: Prioritize rules from specific to general


Lofty checks routing rules from top to bottom. Once a lead matches a rule, Lofty applies it and stops checking the remaining rules.

This means you should organize rules from most specific to most general.

A typical structure looks like this:

  1. Highly targeted rules
  2. Location or team-specific rules
  3. Broader routing rules
  4. Default Rule

For example, a rule for website leads from a specific ZIP code should appear above a broader website-lead rule.

Step 7: Test your routing rules


Don't wait for a real lead to find out whether a new rule works. Create a test lead that matches the conditions you've added and check whether it reaches the expected agent.

If the lead does not follow the path you were expecting, check the rule conditions and the order of your routing rules. You can also check the routing logs to know which rule was applied and why the lead was or was not matched.

Testing first lets you catch issues with the conditions, agent availability or rule order before a real lead is impacted.

How does data quality affect Lofty lead routing?


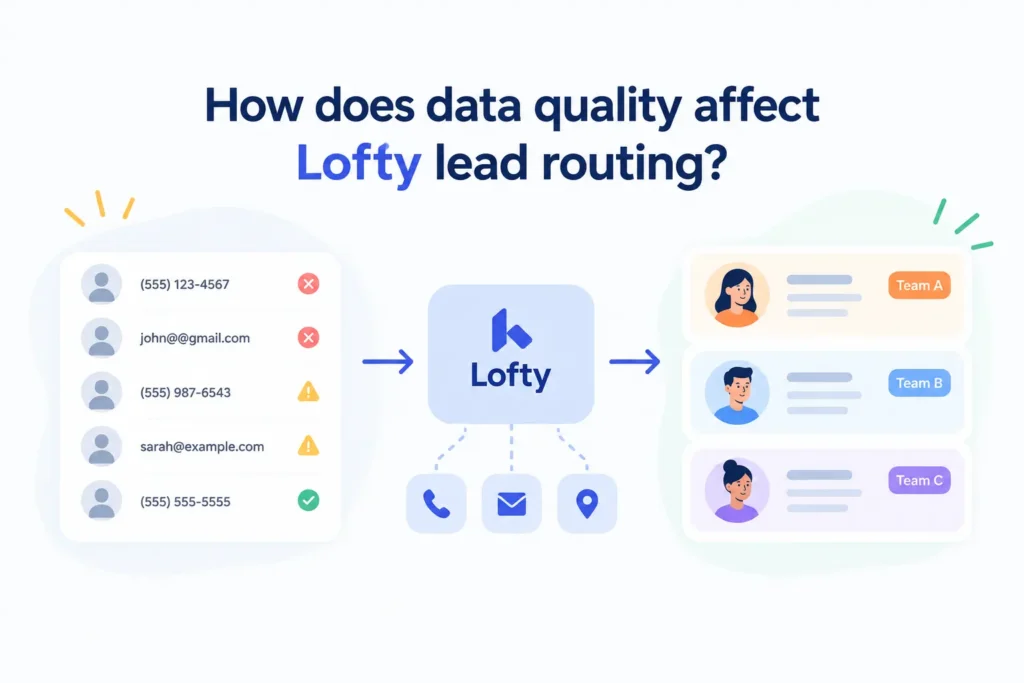
Data quality affects Lofty lead routing and team assignment.

The routing of leads depends on the data associated with each lead. If your routing fields are missing, out of date or incorrect, Lofty might go down a different path than you want.

The effect depends on what routing rule you are using:

  • Territory routing: One wrong ZIP code can route a lead to the wrong territory and a rep who doesn't even cover that area.
  • Round Robin routing: A lead with an incorrect source, tag, or location may match the wrong routing rule and end up being distributed to the wrong group of agents.
  • Lead scoring or qualification routing: If qualification information is incorrect or missing, a lead may not go to the rule for high-priority leads or low-priority leads.

If you've ever looked at a routing issue and thought, "Why did this lead end up here?", it's worth checking the data before changing the rules.

After all, routing is only as good as the information feeding it. A wrong phone number, outdated contact details, or incomplete lead data can create problems long before a sales rep gets involved.

That's why many teams validate contact data as it enters the CRM. For HubSpot and Salesforce users, Clearout Data Pulse validates key contact details directly within the CRM.

In many cases, the routing rule isn't the problem. The rule did exactly what it was supposed to do. The data it received was the issue.

What does good lead data improve after routing?


Good lead data helps Lofty apply routing rules correctly and gives reps a more usable record once the lead is assigned.

When routing fields and contact details are accurate:

  • Leads are more likely to reach the intended team or rep.
  • Reps can start follow-up without first correcting basic contact information.
  • Invalid phone numbers and email addresses are less likely to waste outreach time.
  • Teams spend less time fixing records after assignment.
  • Downstream sales workflows can work with more reliable contact information.

So data quality is not just about getting the lead to the right person. It also helps the rep act on the lead once it arrives.

How can you validate contact data before lead follow-up?


A lead assigned in seconds can still take hours to act on if the underlying contact data can't be trusted.

Sales reps shouldn't have to investigate every record before reaching out. The more time spent checking emails, phone numbers, and contact details, the less time spent moving opportunities forward.

Clearout Data Pulse validates email, phone, and name data directly within HubSpot and Salesforce. It helps keep contact records ready for follow-up instead of adding another task to the rep's workflow.

Contact enters CRM → Data Pulse validates contact data → results are written back → downstream sales workflows use the updated record

For example, if a phone number is invalid, Clearout Data Pulse can flag it in the CRM instead of leaving the rep to discover the problem during a call. The same applies to invalid email addresses that could otherwise lead to failed follow-up.

Clearout Data Pulse keeps core contact information reliable for the sales workflows that happen around and after lead assignment.

Clean routing fields help determine where a lead goes, while reliable contact data helps the assigned rep act on it once it arrives.

Keep CRM contact data accurate with Clearout Data Pulse

What happens after Lofty routes a lead?


Lead routing does more than decide which agent receives the lead. The assignment can also affect what happens next in the sales process. Several automated actions depend on the lead reaching the primary agent role.

Lofty states that the following actions occur after lead routing is complete:

  • Welcome Email
  • Welcome Text
  • Smart Plan Emails and Texts
  • Property Alerts
  • AI Assistant Engagement

These actions depend on a person being assigned to the primary agent role on the lead profile.

Routing delays can therefore delay these automated communications. A lead that remains in a claim-based routing process may not trigger these actions until assignment is completed.

Which lead assignment method should you choose in Lofty?


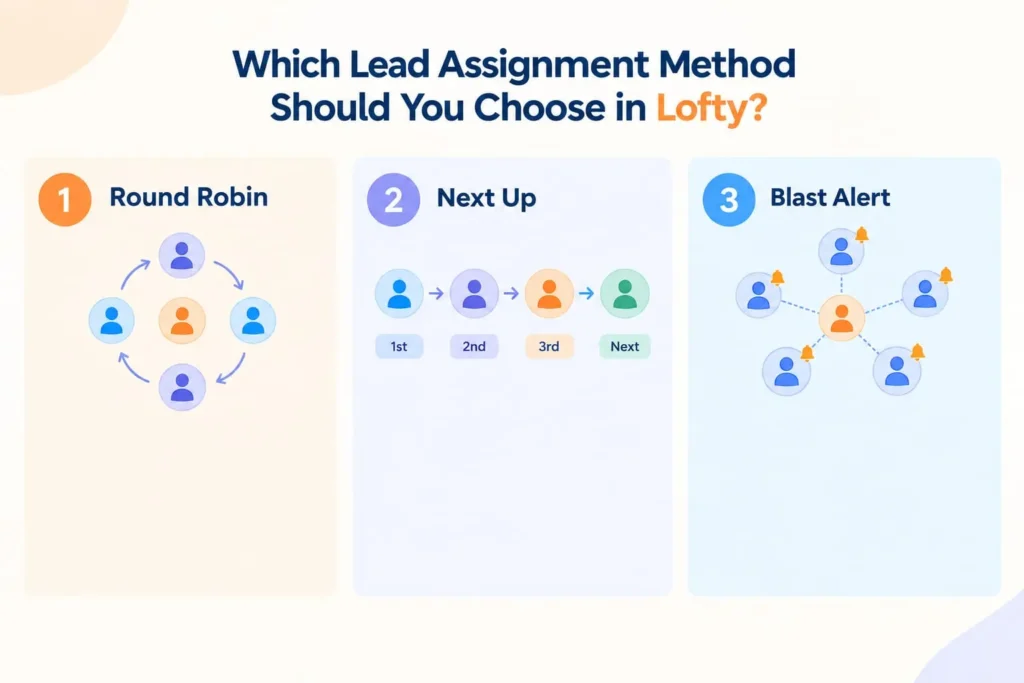
Comparing 3 lead assignment methods: Round Robin, Next Up, & Blast Alert.

Lofty provides different assignment methods for distributing leads. The right option depends on how your team handles incoming opportunities.

Lofty CRM round robin


Round Robin distributes leads through a group of agents in rotation. Each new lead moves to the next agent in the sequence. The system continues cycling through the selected agents.

One important detail is that editing a Round Robin rule resets its rotation. Consider these factors when changing an active routing rule.

Next up


Next Up sends the lead through an ordered group of eligible agents. Next Up assigns the lead to the next eligible agent based on availability or queue order. It can also use a weighted hunger value. Next Up can be useful when agent availability and response time matter.

Lofty CRM blast alert


Blast Alert notifies multiple eligible agents about a new lead at the same time. The first agent to claim the lead becomes the assignee.

To use Blast Alert for lead routing, select it as the assignment method when setting up the routing rule, then choose the eligible agents who should receive the alert.

How to manage existing Lofty lead routing rules?


You can manage existing Lofty lead routing rules from the Lead Routing settings.

Go to Settings > Lead Routing and select the relevant role or routing level.

You can then manage rules using the following options:

Edit a rule


Open an existing rule when its conditions, agents, working hours, or assignment method need to change. Review the full configuration after editing. Changes to active routing rules can affect future lead assignments.

Pause or resume


Pause a routing rule when it should temporarily stop processing matching leads. Resume the rule when it should become active again. Check the rule order after resuming it.

Copy a rule


Copy an existing rule when a new rule needs similar conditions or assignment settings. Update the copied rule before saving it. This prevents two rules from unintentionally handling the same leads.

Delete a rule


Delete a routing rule when it is no longer needed. Review the remaining rule order afterward. Removing a rule can change which rule receives leads that previously matched it.

Reorder rules


Drag and drop rules to change their position in the routing list. Review the order whenever you add or change a rule.

Frequently asked questions about Lofty CRM lead routing

1. Does Lofty route leads being manually added?
Lead routing can depend on the type of lead and the routing role being used. Check the routing settings for the specific role you're configuring rather than assuming that every manually added lead follows the same routing process.
2. Can Lofty route leads by location?
Yes. Location and ZIP code can be used as routing conditions. You can combine location with other conditions, such as lead source or tags, to create more specific rules.
3. What happens when no rule matches?
Lofty moves the lead to the Default Rule. The default rule is the last rule on the agent routing page. It can assign leads directly or use Next Up or Blast Alert.
4. Can Lofty route lead to different roles?
Yes. Lofty can route leads to roles such as Agent, Assistant, and Lender. Team owners or admins can also create up to 10 additional custom roles. Routing rules can assign users to those role slots when configured.

Share this article

Recent Posts

28 Sep 2026
How to Set Up Lead Routing Rules in Lofty CRM

Learn how to set up lead routing rules in Lofty CRM, from conditions and rule order to Round Robin, ...

25 Sep 2026
Post-Event Outreach: Find Emails From Conference Contacts

Learn how to build a post-event outreach list from badge scans, business cards, and LinkedIn, and fi ...

24 Sep 2026
Clearout vs. Koalify Email Verifier

Comparing Clearout vs. Koalify email verifier on accuracy, catch-all detection, CRM integrations, an ...

24 Sep 2026
Clearout Expands Into a Data Qualification Layer for GTM Teams

Clearout builds a data quality layer for GTM teams with Data Pulse, Form Guard, Deep Verify, and Cle ...

17 Sep 2026
Free Email Verifiers vs. Paid Tools: I Tested the Accuracy Gap

We tested 40+ emails across 6 tools to compare free vs. paid email verification. See accuracy, catch ...

Clearout's

Form Guard

Validate email, phone & name on any forms!

  • Real signups only
  • Verified emails
  • Valid phone numbers
  • No fake names
  • Cleaner CRM
  • No devs needed
Try for Free Now

Email Verification, Email Finding Form Guard & Prospecting Service

Expand Your Reach By Finding & Verifying Ideal Prospects.

Sign up & get 100 free credits

No Credit Card required

Create Free Account
Company

Why Clearout?

Pricing

Contact Us

Careers

Press

Enterprise

Sitemap

FAQ

Status

Products

Email Verifier

Catch-all Verification

Email Finder

Form Guard

Data Pulse

Prospect

LinkedIn Email Finder

Reverse Lookup

Google Sheets Add-on

WordPress Plugin

ClearoutPhone

What's New?

Resources

Integrations

HubSpot

Team Account

API

Compare Email Verifier

Compare Email Finder

Compare Prospecting

Use Cases

Blog

Help

Legal

Privacy Policy

Terms

DPA

Security

Trust Center

Certification

ISO 27001/2022

SOC 2 Type 2

GDPR

Partnership

HubSpot Certified

Affiliates

Partners

Clearout for browser

⚡ Supercharge Your Prospect Research with Clearout's LinkedIn Chrome Extension - Find and Verify Emails with Confidence!

Clearout Chrome extension

clearout
© 2026 Clearout Inc. All Rights Reserved. Powered by Clearout.
Validate Enrich New Salesforce contacts automatically with Data Pulse. Learn More ➞
X