


clearout
  • Products
    • Email Verifier Verify emails addresses individually, in bulk or through API, with 99% accuracy
    • Email Finder Find individual or bulk emails by entering the person & company name or domain
    • Form Guard IconForm Guard Protect your forms from spam, bots, and invalid submissions with real-time email, phone, and name verification.
    • Form Guard IconData Pulse Verify, enrich, and monitor your CRM contacts in real time - heartbeat monitor for your data.
    • Prospect SQL/MQL list building with high levels of personalization, real-time data enrichment and prospect search
    • Clearout For SheetsVerify email addresses directly on Google Sheets with Clearout for sheets add-on
    • Prospect – LinkedIn Chrome ExtensionBuild verified, targeted prospect lists directly from LinkedIn profiles
    • ClearoutPhoneValidate phone numbers across 240+ countries in bulk, quick or real time validation
    • Free Tools
    • Disposable Email Checker
    • Reverse LinkedIn Profile Lookup Tool
    • Reverse Email Lookup Tool
    • Email List Cleaner
    • Company Domain Finder API
  • Resources
      DEVELOPERAPI iconAPI
      Clearout APIs are structured around REST and JSON
      Webhooks iconWebhooks
      Capture real-time events in your application workflow
      Form Guard iconForm Guard
      Real-time form validation to keep bad contacts out of your CRM
      KNOWLEDGE BASEGetting started iconGetting started
      Sending campaigns without bounces is made simple
      FAQ iconFAQ
      Easily find answers to services, security and common questions
      USE CASESLead Generation iconLead Generation
      Learn how professionals generate quality leads
      GUIDESPricing arrow iconTransparent & flexible pricing to support pay-per-use or recurringCompare Email Verification Tools arrow iconAI-powered email verification with 99%+ accuracy, real-time validation, and transparent risk scoringCompare Email Finder Tools arrow iconPre-verified B2B email addresses with confidence scoring, find real person email, not role-based addressData Pulse & HubSpot Breeze Intelligence arrow iconPre-verified B2B email addresses with confidence scoring, find real person email, not role-based addressBLOGSEmail Verification ToolsFind Anyone’s Email Address
      Most Accurate, Fast & Free Ways
      Form Validation
      Importance, Ways & Best Practices
      View All Blogs
  • Pricing
  • Integrations
  • Enterprise
  • Login
Try it free Book a 1-to-1 demo
Akanksha Mishra / September 2, 2026 September 2, 2026

Bounce Rate Above 2%? What to do in the Next 24 Hours


Bounce Rate Above 2%? What to do in the Next 24 Hours

Your email campaign is live. The emails are out, and you're expecting replies, meetings, and conversions to start rolling in. Then you open the campaign report.

Bounce rate: 15%.


A bounce rate this high is more than a campaign problem. It's a warning sign that your email data needs immediate attention.

If your email bounce rate has crossed 2%, the next 24 hours matter. Here are the email deliverability best practices that can get your future campaigns back on track.

Table of Content


‣ What to do within 24 hours when the email bounce rate exceeds 2%?
‣ How to trace a bounce rate spike?
‣ What are the Gmail bounce limits?
‣ What is the Outlook bounce rate limit?
‣ What is the Yahoo bounce rate limit?
‣ How to resume sending after a spike?
‣ How to prevent another bounce spike?
‣ Email bounce rate recovery checklist
‣ Key takeaways
‣ FAQ
What to do within 24 hours when the email bounce rate exceeds 2%?


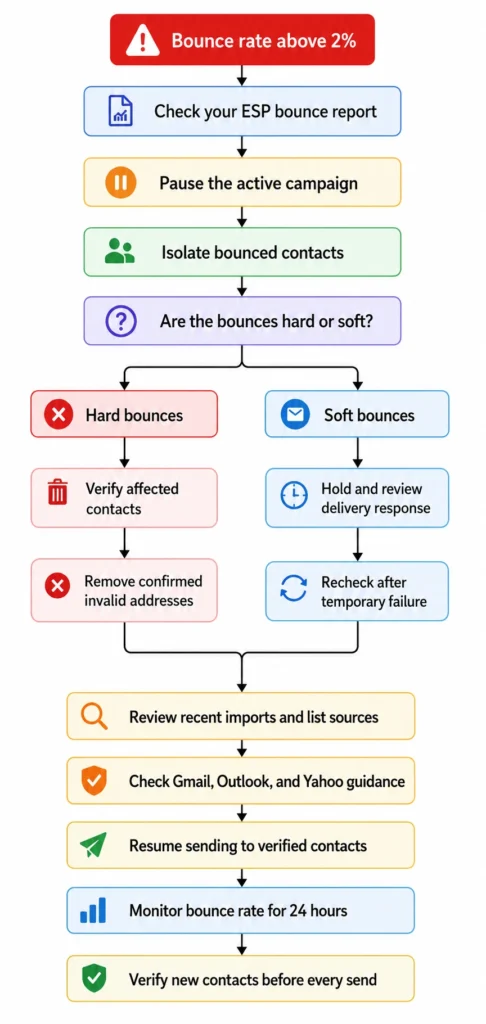
Once the campaign is paused, focus on the affected contacts instead of changing your entire database. The sequence below shows what to check, when to verify contacts, and when sending can safely resume.

Bounce rate troubleshooting flowchart from diagnosis to prevention.

  • Check your ESP report

    Start with the bounce report for the campaign that crossed 2%. Check bounce types, SMTP response codes, affected domains, and when the bounce rate spikes.

    Look for responses including “550 User Unknown,” “mailbox does not exist,” or “domain not found” in reports. Temporary deferrals may indicate delivery issues that can be cleared without permanently invalidating the affected recipient address immediately.

    Adobe Marketo Engage categorizes codes in the 400 range as soft bounces, and those in the 500 range as hard bounces. These include 550 for mailboxes, 5.1.1 for permanent email delivery error, and 421 or 450 for failures. Different ESPs may have different codes, so check each message against your ESP's code before determining the next steps.

  • Pause the active campaign

    Once you confirm the spike, pause the affected campaign. This prevents additional sends while you identify the affected contacts and source. Keep the campaign paused until the segment has been reviewed and cleaned.

  • Isolate bounced contacts

    Keep them out of your active sending list while you investigate. Record the campaign, list source, import date, bounce type, and recipient domain.

  • Verify and suppress hard bounce contacts

    For hard bounces, verify affected contacts before sending again to confirm which addresses remain unsafe for delivery. Clearout Email Verifier can check bounced segments in bulk and identify invalid, risky, disposable, and catch-all email addresses. If verification confirms an address is invalid, keep it suppressed.
  • Hard bounces usually indicate permanent delivery problems, while soft bounces are often temporary. For more details, check our bounce rate guide.

  • Review soft-bounced contacts separately

    Do not suppress soft bounces immediately; review the delivery response before deciding whether the address needs suppression. Temporary deferrals, mailbox-full errors, and receiving-server issues can clear without permanently invalidating affected recipient addresses for delivery.

    Hold these contacts separately and retry according to your ESP's guidance after reviewing delivery responses. If an address repeatedly fails, follow your ESP's suppression rules instead of using a retry count again.

How to trace a bounce rate spike?


After handling the bounced contacts, trace the spike back to its campaign, segment, import, or data source. Comparing affected contacts with recent database activity can reveal whether one source caused most of the failures.

  • Review recent imports

    If one source accounts for most of the bounces, quarantine that source and run its remaining contacts through Clearout Email Verifier before using them again.

    Check:

    • CSV imports
    • Event lists
    • Webinar registrations
    • Form submissions
    • CRM imports
    • Third-party data
    • Recently synced contacts
    Then, compare the email bounce rate for each source separately.

    If one source accounts for most of the bounces, quarantine that source and verify its remaining contacts before using them.

  • Compare list segments

    Next, break the affected contacts into smaller groups.

    Check the campaign, import date, data source, recipient domain, contact type, and sending domain.

    If several unrelated segments show the same increase, expand the investigation to your sending setup and recent database changes. A spike concentrated in one segment usually points toward that segment's source or recent data change.

  • Review bounce codes

    If you have a 15% email bounce rate, start deleting contacts or changing your email strategy, and dig into the bounce codes. Look at the SMTP responses or the classifications provided by your ESP. Some bounces happen because the email address no longer exists.

    Others are caused by the recipient's mailbox being full, server temporarily unavailable, or the message being blocked due to policy reasons. If you're looking for a breakdown of common responses, check out our email bounce codes guide.

What are the Gmail bounce limits?


Gmail did not publicly announce a universal 2% email bounce rate limit.

Its current sender requirements focus on authentication, spam rates, sending behavior, and message compliance. Gmail also advises senders to reduce sending volume when messages start bouncing or being deferred.

Once delivery improves, sending volume should increase gradually rather than returning to the previous level immediately. For this workflow, use 2% as your internal investigation trigger.

What is the Outlook bounce rate limit?


Microsoft's Dynamics 365 documentation says an acceptable bounce rate generally should not exceed 2%.

However, the same documentation lists an 8% threshold for Dynamics 365 Customer Insights - Journeys. That figure applies to the specific product and should not be presented as a universal Outlook limit.

When Outlook-related bounces spike, compare the affected contacts with your ESP responses before increasing volume.

If invalid recipients dominate, clean that segment. If temporary errors dominate, investigate the delivery responses first.

What is the Yahoo bounce rate limit?


When a spike occurs in Yahoo bounce rate, check invalid-recipient bounces, complaint rates, authentication, and SMTP responses.

Remove confirmed invalid contacts and investigate repeated delivery failures before increasing sending volume.

How to resume sending after a spike?


After cleaning the affected segment, test the recovery with verified contacts and smaller sending volume before expanding again.

This approach also aligns with Gmail's guidance to increase sending volume gradually and reduce volume when bounces or deferrals occur.

  • Send verified contacts first

    For the first recovery batch, use verified contacts from unaffected segments not part of the problematic campaign. Keep confirmed invalid addresses suppressed and exclude contacts from the source responsible for the original spike.

    For catch-all results, use Clearout Email Verifier to assess whether those addresses are safe to send. It helps you avoid invalid email addresses entering your list.

  • Review recovery results

    Watch the bounce rate as the recovery batch goes out.

    Compare it with the original campaign and check whether the same domains or sources are failing again. If the rate rises, pause and investigate before expanding volume.

  • Document the failed source

    Document where the problematic contacts came from, such as forms, imports, purchased lists, integrations, or manual uploads. Record import date, list type, affected segment, source, and bounce pattern to trace the issue accurately.

    Once you identify a recurring problem source, flag it in your CRM or list workflow. This makes it easier to verify future imports before they enter active campaigns.

How to prevent another bounce spike?


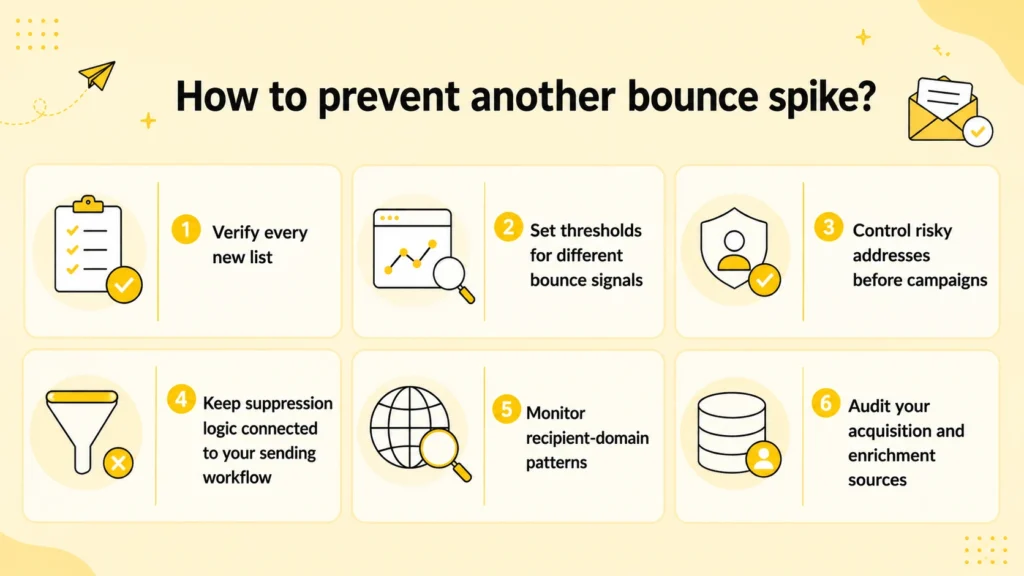
Six ways to prevent email bounce spikes.

Preventing another spike requires a verification checkpoint before new contacts enter an active campaign or sending segment. Using Clearout Email Verifier at this stage can help identify invalid or risky addresses before they affect your next send. Regular monitoring also helps catch unusual bounce increases early.

  • Verify every new list

    Verify new contacts with Clearout Email Verifier before adding them to an active sending segment. It supports bulk verification and real-time validation, helping check contacts before they enter your sending workflow. Pay particular attention to event lists, form exports, CRM imports, and third-party datasets.

  • Set thresholds for different bounce signals

    Do not rely on the overall bounce rate alone. Track hard bounces, soft bounces, SMTP responses, and recipient-domain patterns separately. A sudden concentration of 5xx SMTP responses or failures from one domain can reveal a data or delivery problem before the overall rate becomes significant.

  • Control risky addresses before campaigns

    Do not automatically treat every unknown or catch-all address as safe to send. Use deeper verification when an address needs additional validation before entering a campaign. Clearout's Deep Verify can provide a Safe to Send result for uncertain addresses, giving you another checkpoint before delivery.

  • Keep suppression logic connected to your sending workflow

    Automatically suppress confirmed invalid addresses so they cannot re-enter future campaigns through another import or workflow. Also preserve bounce and verification status in your CRM, allowing future campaigns to exclude previously identified problem addresses.

  • Monitor recipient-domain patterns

    Review bounce patterns by recipient domain instead of looking only at campaign-level averages. If failures suddenly concentrate around specific domains, investigate their SMTP responses before increasing campaign volume or changing your sending strategy.

  • Audit your acquisition and enrichment sources

    Track where new contacts enter your database. If one source repeatedly produces invalid contacts, fix the source or verify its data before the next import.

    Compare verification results across forms, events, CRM imports, enrichment providers, and other acquisition sources. A recurring pattern can identify which source needs correction rather than repeatedly cleaning the resulting contacts.

Email bounce rate recovery checklist


Use the checklist below whenever your email bounce rate crosses your internal threshold:

  • Check the ESP bounce report.
  • Pause the active campaign.
  • Isolate bounced contacts.
  • Verify new lists with an email verifier before future campaigns.
  • Identify hard and soft bounces.
  • Remove confirmed invalid addresses.
  • Hold temporary soft bounces.
  • Review recent imports.
  • Compare bounce rates by source.
  • Check SMTP responses.
  • Check Gmail, Outlook, and Yahoo guidance.
  • Resume with verified contacts.
  • Monitor the next sending batch.

Key takeaways


Pause the campaign that has a higher email bounce rate and check other email metrics before sending any emails again. Isolate the affected contacts, verify the segment with an email verifier, remove confirmed invalids, and hold temporary failures for review. Then trace the spike to its campaign, import, or data source. Check the relevant provider guidance before restarting with verified contacts.

Finally, monitor the recovery batch and verify new contacts before future sends. This approach keeps a single bad import from becoming a recurring deliverability problem.

Verify your email list before every campaign

FAQ


1. What is a good bounce rate?
A good email bounce rate is low and stable. A 2% rate is commonly used as a practical internal benchmark. However, providers do not share one universal bounce-rate threshold. Microsoft documents considers 2% as a good number for email bounce rate and Gmail have their own deliverability and reputation criteria.
2. How do you calculate email bounce rate?
To calculate your email bounce rate, use this formula: Bounce rate = (Number of bounced emails ÷ Number of emails sent) × 100. If 100 emails bounce back from 5,000 emails sent, then the bounce rate is 2%.
3. What is the difference between exit rate and bounce rate?
Bounce rate and exit rate look at different parts of the customer journey. Bounce rate tells you how many emails failed to reach recipients, while exit rate shows where website visitors leave. In simple terms, one measures email delivery, while the other measures website behavior.

Share this article

Recent Posts

02 Sep 2026
Bounce Rate Above 2%? What to do in the Next 24 Hours

Bounce rate above 2%? See what to do in the next 24 hours, spot hard and soft bounces, verify contac ...

31 Aug 2026
HubSpot Data Quality Audit Framework for New Clients

Learn how agencies can audit HubSpot CRM data, identify critical issues, score data quality, and bui ...

31 Aug 2026
Why Is My Email Click Rate Dropping In 2026?

Discover why your email click rate is dropping in 2026, how security bots inflate clicks, and how to ...

22 Aug 2026
Why Validating Contact Information Matters for Shopify Checkouts

Shopify checkout validation catches typos, fake numbers, and disposable emails. See how Clearout's F ...

21 Aug 2026
Email Data Quality Benchmark Report (2026)

Explore 2026 email data quality benchmarks for bounce rates, list decay, and deliverability by indus ...

Clearout's

Form Guard

Validate email, phone & name on any forms!

  • Real signups only
  • Verified emails
  • Valid phone numbers
  • No fake names
  • Cleaner CRM
  • No devs needed
Try for Free Now

Email Verification, Email Finding Form Guard & Prospecting Service

Expand Your Reach By Finding & Verifying Ideal Prospects.

Sign up & get 100 free credits

No Credit Card required

Create Free Account
Company

Why Clearout?

Pricing

Contact Us

Careers

Press

Enterprise

Sitemap

FAQ

Status

Products

Email Verifier

Email Finder

Form Guard

Data Pulse

Prospect

LinkedIn Email Finder

Reverse Lookup

Google Sheets Add-on

WordPress Plugin

ClearoutPhone

What's New?

Resources

Integrations

HubSpot

Team Account

API

Compare Email Verifier

Compare Email Finder

Compare Prospecting

Use Cases

Blog

Help

Legal

Privacy Policy

Terms

DPA

Security

Trust Center

Certification

ISO 27001/2022

SOC 2 Type 2

GDPR

Partnership

HubSpot Certified

Affiliates

Partners

Clearout for browser

⚡ Supercharge Your Prospect Research with Clearout's LinkedIn Chrome Extension - Find and Verify Emails with Confidence!

Clearout Chrome extension

clearout
© 2026 Clearout Inc. All Rights Reserved. Powered by Clearout.
Validate Enrich New Salesforce contacts automatically with Data Pulse. Learn More ➞
X